Archive
Synchronous scrolling DataGrid in Silverlight
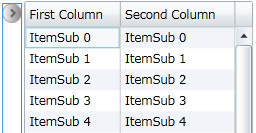
If you read the title of this post, you can think WTF. But I have used it in a project… I have used it for hiding some columns in a DataGrid with an expander:


You can see in the first image that the first datagrid is expanded and on the second image the first datagrid is not expanded. If you scroll with the first DataGrid the second DataGrid scrolls automatically to the same position of the first DataGrid and vice versa.
You can do this with the following XAML code:

The steps you have to do:
1) Bind the DataGrid wich must scroll synchronous to the current Datagrid on the ‘SynchronousScrollingDataGrid’ property: SynchronousScrollingDataGrid=”{Binding ElementName=firstDataGrid}”
2) Give the ‘RowHeight’ property a hardcoded value, because the back-code of the Synchronous scrolling DataGrid uses this property. If the RowHeight is not set the value is ‘NaN’.
3) As you can see in the example code above you can bind the ‘SynchronousScrollingDataGrid’ property of the second DataGrid to the first DataGrid.
I want to say thanx to my colleague Sandrino Di Mattia for his blog post “Controlling and viewing the ScrollBar positions of your Silverlight DataGrid”. This post was very usefull for me to create my synchronous DataGrid.
IPhone (like) switch button in Silverlight
On a project I had the intention of using an IPhone-like switch button for setting a confidential flag in the UI. After some research on the internet I haven’t found an usable solution…
I spend some time to design a switch button in XAML, the switch button is based on a classical checkbox control: if the switch button has the 0 value, the control has the unselected state, if the button has the 1 value, the control has the selected state.
A preview:


You can change the color in the Generic.xaml by replacing the following XAML with your own brush:
<!--Checked rectangle brush

YOU CAN CHANGE IT IN YOUR PREFERED GRADIENT-->

<Rectangle.Fill>

<LinearGradientBrush EndPoint="0,0"

StartPoint="0,1">

<GradientStop Offset="0"

Color="#D8D8D8" />

<GradientStop Offset="0.5"

Color="#C6C6C6" />

<GradientStop Offset="0.5"

Color="#D8D8D8" />

<GradientStop Offset="1"

Color="White" />

<GradientStop Color="#FFBCC1BE"

Offset="0.5" />

</LinearGradientBrush>

</Rectangle.Fill>
Hello world!
Welcome to my blog!
You can find here some blog posts over my experiences of .NET, Silverlight and some other interesting stuff!
I hope you enjoy it!
If you have suggestions, remarks or question, feel free to contact me!